The Fill-in variable allows you to request additional information when executing a template. This information will be requested by displaying the Input form at the time the template is executed.

The Input form window requests additional data. When clicking on the Send Text button, the generated template will be sent to the active application.
To create a new Fill-in variable
1.In the Quick edit or the Template editor, right-click on the position where you want to insert the new variable placeholder, and choose Variables and then New fill-in
PhraseExpander opens the new fill-in variable window
2.Fill in the required fields and click on the Preview button to see how the fill-in looks like
3.Click OK to confirm
The template now contains a new variable and its placeholder has been inserted into the document
An overview of the Fill-in variable design window
Each fill-in has a set of standard properties which are described below.
PhraseExpander allows you to use different fill-ins that are specialized based on the data you need to gather.

The fill-in variable design window lets you define how the additional information will be requested.
Here's a brief overview of the fill-in variable design form:
1.Name: the unique name of the variable. The variable name cannot contain blanks and can be up 30 characters long. Click on the pencil icon to make changes
2.Label: a description of the fill-in. It's shown when executing the template
3.Additional instructions: additional instructions to display to guide people when they are entering the data
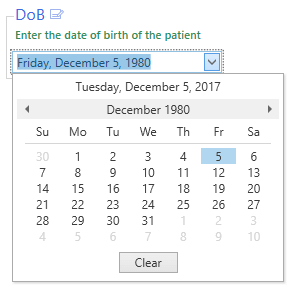
4.Display as: define how the fill-in should be displayed. The available options are: List, Grid, Text, and Calendar.
5.Encode text for URLs: if you are using an fill-in variable to generate URLs, you want to make sure that this option is checked, so that the generated web address doesn't contain characters that don't play nice with browsers (like Internet Explorer, Chrome or Firefox).
6.Additional options related to the type of display: based on the chosen display type, PhraseExpander adapts the interface to display additional settings and options
7.Pre & Post: customize the text that will be inserted before (pre) and after (post) the fill-in. This text will be inserted only if the fill-in produces some text. You can also use the #LABEL# placeholder to insert the contents of the Label field of the variable.
8.Adapt casing: it tells if the casing of the generated text has to be adapted (e.g. converting the first letter to uppercase) when placed into the template
9.Display all variables: opens the Manage variables window to edit all the variables contained in the template
10.Preview: it gives you a quick way to see how the fill-in will look like, without having to trigger the entire template
NOTE: right-clicking in any field will give access to macros that can be inserted in virtually any field of the variable.
Variables placeholders
All the variables placed inside the template contents will be displayed as
{{varname}}
Fill-in types available
PhraseExpander can display different kinds of fill-ins, and you can choose the most appropriate one based on the kind of information you need to request.
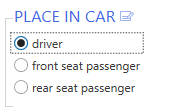
Display a list of predefined values that the user can check. The list can be displayed expanded or as a dropdown, single or multi-selection.
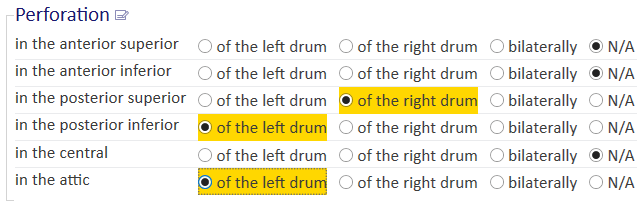
Display a grid selection with multiple available options for each row.
Display a text box with an optional predefined text (it can be single line or multi-line).

Display a calendar selection box.