

Display a grid selection with multiple options for each row.

The Grid user input lets you select different values for each row.
To set the fill-in variable as Grid
In the Variable editing window, choose Grid in the Display as box.
Customizing the Grid fill-in

The Grid fill-in design window
You can customize the Grid fill-in through the following options:
1.Predefined values source: choose if the predefined values are entered from a static list or are gathered from the templates contained in a group or glossary.
2.Custom format: customize the text that is generated for each item, pre-pending or appending additional text to it. #ITEM# represents the current selection. The #N# and #NL# placeholders can be used to create a numbered list based on the number of selected items. For example, if you enter "#ITEM#", the text that the user enters will be automatically put between double quotes.

3.Predefined values: a list of predefined values the user can choose from. Each value represents a row in the grid. You can click on the Paste icon to paste a sequence of items (separated by a new line).
4.Required: when set, the form cannot be submitted if at least one item for one row has not a value that is different from N/A
5.Display grid columns: it tells if the text of the column will be displayed before or after the predefined value (e.g. before: of the left drum in the anterior superior / after: in the anterior superior of the left drum. This setting is in effect only if Custom text (4) is not set
6.Multi-selection: if checked, each column will be displayed with a checkbox, so that more than one item per row can be selected.
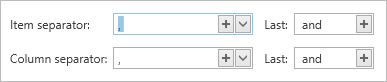
7.Separators: PhraseExpander inserts a separator between each row (Item separator). You can use grid to create a text that read like natural language by setting a different value for the last item.If the multi-select option is checked, you can select a separator for each grid column as well (Column separator).
8.Grid columns: the columns to display for each item. You can click on the Paste icon to paste a sequence of items (separated by a new line).
9.Custom text: the custom text is used to customize the text that is inserted when there are selected items. You can use the #SEL# placeholder to specify where the selected items will be inserted. To each selected element, PhraseExpander associates a list of selected columns, through the #COL# placeholder. You can also use the #LABEL# placeholder to insert the contents of the Label field of the variable.
10.Custom N/A text: this text is displayed when all the items are set to N/A.
Preselecting a column
All columns will be displayed as unchecked, by default. If you want to preselect certain columns, just prepend a * to the element you want to display as checked.
In the example above, if you want to preselect bylaterally, you can just write *bylaterally.
Assign a shorter description to a predefined value or column
If you want to display a text that is different from the one that will be entered by PhraseExpander (for example, because it's too long or you want to associate a code to something that is easier to remember), you can do that by entering the text in the following format.
[description]text to insert
description: the description that will be shown when displaying the fill-in
text to insert: the actual text that will be inserted when the template is executed
Populate from Group
PhraseExpander can dynamically load the predefined values from the contents of a glossary (or group).

PhraseExpander can load the predefined values to display from the template contained in a group
To populate the predefined values from a Group
1.In the variable design window, click on Group
2.Select the group that contains the templates that you want to use. When executing the template, PhraseExpander will display the description of the template but will insert the content of the template
3.The templates are ordered by Description (you can click on Sort by descending order) to order them by Description in descending order
4.Click on the Preview button to check the results
NOTE: PhraseExpander will display the templates contained in the selected glossary or group and in all the contained groups.
